Features describe the actions you want to perform in Sage 200. For example, the Purchase Ledger feature Enter New Supplier Account, describes the action of adding a supplier account within Sage 200.
When Sage 200 is installed, features are organised into feature groups which match the modules. For example, there is a group for Sales Ledger, a group for Cash Book, and there are also groups for Workspaces and Workspace Actions.
Workspaces are desktop views that may contain several panels, and allow you to view information from across Sage 200 in one place.
A number of default workspaces are provided with Sage 200, which are listed automatically within the features list. You can create additional workspaces if you select Can Edit Workspaces when you set user properties.
When you create additional workspaces, they are automatically available to all users of Sage 200. To ensure that they are not visible to everyone and that only certain users can use the workspaces, you must add them as features and authorise them for the roles you want to use those workspaces. Workspaces also make use of workspace actions.
Within workspaces, there are a number of standard actions which you can apply. You will only be able to perform the action within the workspace if you are authorised to perform the action within the module features list.
In addition, there are Workspace Actions which can be applied when you are creating workspaces.
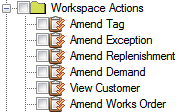
These actions allow you to determine within a workspace whether you are amending demand, viewing a customer and so on.
For more information about creating workspaces and using any workspace action, see Customising Workspaces in the Sage 200 help.
If you need to create additional workspace actions, contact your Business Partner.
Features normally have targets such as reports or data entry forms. For example, the feature Enter New Supplier Account has a data entry form as a targetA target is the action associated with a feature. Each feature must have a target in order to do something. For example, a target could be to open a form (window), produce a report, run any OS Invocable (any application or process you can access through the Run option in the Microsoft Windows Start menu), open a workspace (an area on your desktop which can contain several panels of information from Sage 200 modules), or open a content part (an area of a workspace). All features installed with Sage 200 and with any add-on packages have targets added automatically.. This means when you select the Enter New Supplier Account feature within Sage 200, a data entry form opens for you to enter the supplier details.
Features installed with Sage 200 (and those installed with any add-onThird party software that links into the Sage 200 suite. packages) will have targets added automatically. You can add features manually, using the Features option. If you add features to the system manually, you will also need to add targets to these features manually.
You can add the same feature to more than one group, move features between groups, delete features and authorise roles for features.
Using Menu Design Mode within the Sage 200 Desktop, you can organise features into menus. These menus can be organised for specific users for specific roles. You can organise your own menu in menu design modeAn area of the desktop where you can create and edit custom menus., if you select Can Edit Own Menu in the user's role properties. You can organise menus for other users if you select Can Edit Menus for Roles in the user's properties.
Note: You cannot make any changes to Sage 200 features or features which are installed with add-on packages.
What do you want to do?
Reference
Tip: For the most recent version of this topic, please see our help website here.