If you are a web userThe user can access the Self Service application via a web browser. The user must have the 'Is Web User option' selected on their User properties in Sage 200 System Administration., you can enter
After you have entered a
Select WTE > Timesheets from the drop-down list.
The Summary section shows the total hours entered for your timesheets by status. Select a status and timesheets with that status are displayed in the lower section.
Processed:
Note: You cannot edit
In the Summary area, select This Week.
The Timesheets for week beginning area shows the timesheets for the selected week.
To select the week, click on the date or calendar icon ( ) to display a calendar, or click the arrow buttons (
 ).
).
To display the current week, click This Week.
To add a new timesheet for the displayed week, click Add New Timesheet.
Tip: If you regularly enter timesheets for the same items, the list will include some empty timesheets for items that you have used in previous weeks; to fill one in, click Create.
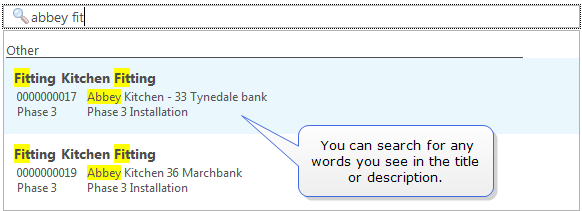
Use the search box to find the required project and project item.You can type in any words from the project or project item names, or their description.

Enter the number of hours for each day of the week.
The time format depends on your system settings; enter the time as:
Select the Charge rate, Cost rate and Pay rate, if applicable.
Note: Depending on your system settings, you may not be able to view or change these rates.
Note: You cannot edit timesheets with a status of Posted.
To find timesheets by date, select This week from the summary section.
 ) to display a calendar, or click the arrow buttons (
 ).
). To edit a timesheet, click Edit next to the weekly timesheet.
Note: You cannot edit timesheets with a status of Posted.
To change the project or project item, Use the search box to find the required project and project item.You can type in any words from the project or project item names, or their description.

Enter the number of hours for each day of the week.
The time format depends on your system settings; enter the time as:
Select the Charge rate, Cost rate and Pay rate, if applicable.
Note: Depending on your system settings, you may not be able to view or change these rates.
You can delete a timesheet if it has a status of Saved, Submitted or Authorised; but you cannot delete a timesheet with a status of Posted.
Select the appropriate summary category to find your timesheet, e.g. Saved will show saved timesheet entries.
Note: You cannot delete timesheets from the This Week summary.
Click Delete.
A confirmation page will appear, listing the timesheets that will be deleted.
After you have deleted the timesheets, you cannot recover them.
Click Delete to confirm deleting the timesheets.
Timesheets can be submitted when they are entered or edited, or you can submit your saved timesheets.
The timesheets will have the status of Submitted, and can then be authorised or posted.
If your Sage 200 system is set up to use authorisation, your submitted
You can check the status of
Note: You can only submit timesheets with a status of Saved or Rejected.
Use the checkboxes to select the required timesheets and click Print.
The timesheets will be displayed in your browser, ready for you to print or save.
Note: Your browser must have a PDF plug-in (e.g. Adobe® Reader®) to view the document.
Other tasks
Authorise timesheets in Self Service
FAQs: Self service timesheets and expense claims